Jul 22, 2026LED Warning Light Bar
How to Specify LED Side Marker Lights for Trucks and Trailers
A B2B sourcing guide to voltage, mounting, color, sealing and approval documents for truck and trailer LED side marker lights.
How to Specify LED Side Marker Lights for Trucks and Trailers
Side marker lamps are small compared with headlamps or light bars, but they can create significant purchasing risk. A lamp that is the wrong color, difficult to mount, poorly sealed or supplied with the wrong approval document can stop an OEM production line or generate repeated fleet warranty claims.
For trailer manufacturers, truck-body builders, importers and commercial-vehicle parts distributors, the correct buying process starts with the vehicle and destination market. It does not start with the lowest unit price.
- Define the Lamp Function Before Comparing Products
“Side marker,” “clearance light,” “position light” and “warning light” are sometimes used loosely in product listings. They are not always the same regulatory function.
A buyer should define where the lamp will be installed, which direction it must be visible from and whether it will operate continuously or as part of another signaling function. This matters because color, photometric performance, approval markings and installation rules depend on the intended function.
A clear functional definition helps the supplier quote the correct version and reduces the risk of a distributor receiving a lamp that looks suitable but cannot be marketed for the intended road application.
- Start With the Destination Market and Required Color
The correct lamp color cannot be selected from appearance alone. Amber is widely used for vehicle side-marker applications, while red may be permitted or required in particular rear-side positions. White, green and blue versions may be suitable for other specialized uses, but can be restricted on public roads.
The purchasing team should state the destination countries, vehicle category and exact mounting position in the RFQ. The supplier should then identify the offered color and provide the related approval document.
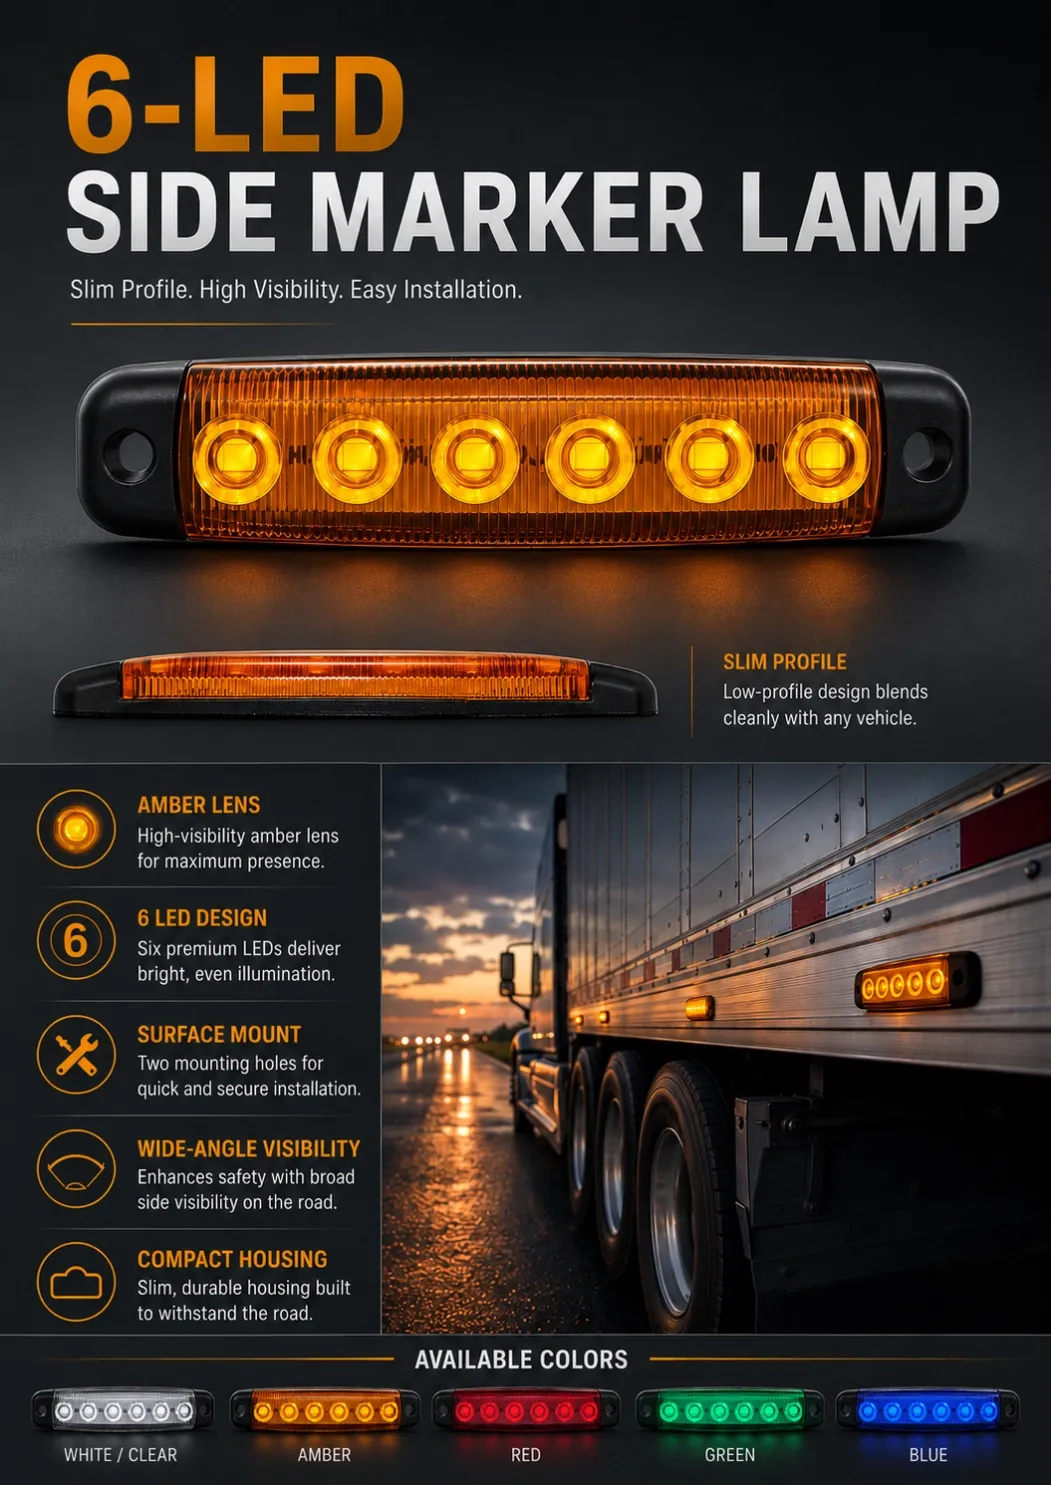
This process protects importers from relabeling, customs and customer-complaint costs. It is especially important for products such as the SC6 that are offered in white, amber, red, green and blue.
- Check Dimensions Against the Actual Vehicle
A compact lamp is useful only when its mounting pattern matches the panel. The important dimensions include overall length, height, thickness, mounting-hole distance and cable exit position.
The SC6 brochure lists an overall size of 96 × 20 × 10 mm and 79 mm mounting-hole spacing. For a truck-body or trailer manufacturer, these numbers allow the engineering team to check interference before ordering samples.
Surface mounting can reduce the need for a large recessed cut-out. That may shorten installation time and make a lamp easier to use in replacement programs. Buyers should still test a sample on the actual panel because access for fasteners and wiring can be different from the drawing.
- Treat Visibility as a Complete-Vehicle Result
The number of LEDs is easy to compare, but LED count does not prove compliant visibility. Lens design, lamp spacing, mounting height, viewing angle and vehicle length all affect the final result.
A six-LED side marker lamp such as the SC6 should be evaluated on the intended truck or trailer. The buyer should view the installation from relevant side angles in low-light conditions and confirm that the lamp is not blocked by cargo-body components, guards or wheel equipment.
For an OEM program, a real-vehicle evaluation reduces the risk of repositioning lamps after production begins. For a fleet supplier, it reduces complaints about lamps that are bright when viewed directly but difficult to see from required angles.
- Confirm Voltage and Wiring as a Production Specification
A 10–30V DC lamp can cover common 12V and 24V vehicle systems. This can reduce voltage-specific inventory and simplify a distributor’s product range.
However, the voltage range is only one part of the electrical specification. Buyers should confirm current draw, polarity, cable length, wire colors, connector and protection against vehicle electrical disturbances. A brochure’s “2-wire connection” is helpful, but production teams need a controlled wiring drawing.
For OEM customers, specifying the correct connector and cable length can reduce assembly labor and prevent field repairs. For aftermarket buyers, clear labels and instructions can reduce returns caused by incorrect connection.
- Verify Sealing and Environmental Performance
Side marker lamps face rain, road spray, washing, dust and temperature changes. The SC6 brochure states IP67 protection and ultrasonic-sealed construction, together with an operating range of -40°C to +85°C.
These claims matter because moisture ingress is a common cause of lens fogging, corrosion and intermittent electrical failure. Better sealing can lower fleet downtime and warranty handling costs.
The buyer should request the IP test report for the exact model and confirm that the cable entry, lens joint and housing design match the tested sample. An IP statement should not be transferred from another lamp in the same catalog. Production inspection should also check the consistency of the ultrasonic-weld joint.
- Understand What Material Names Do and Do Not Prove
A polycarbonate lens and ABS housing can provide a practical lightweight construction. Material consistency supports stable appearance and fit across production batches.
Material names alone do not prove UV life, chemical resistance, impact performance or long-term color stability. These requirements should be supported by project-specific test data when they matter to the application.
Purchasing managers should include acceptable lens color, housing finish and dimensional tolerance in the approved sample. This prevents uncontrolled material or appearance changes from creating complaints for an OEM or private-label brand.
- Check Regulations and Certificates Carefully
The compliance reference on a brochure must match the actual product function. UN Regulation No. 10 addresses electromagnetic compatibility. UN Regulation No. 91 concerns the approval of side-marker lamps. UN Regulation No. 65 concerns special warning lamps.
If a side-marker brochure lists R10 and R65, the buyer should not assume that this proves side-marker approval. Request the certificate for the exact model, inspect the approval number and check the marking on the production lamp. Depending on the market and application, an R91 approval may be the relevant document.
This is not paperwork for its own sake. Correct document control reduces homologation delays, rejected shipments and unsupported compliance claims on packaging or websites.
- Review Warranty, Packaging and Batch Consistency
A one-year warranty, as listed for the SC6, should be supported by a clear claim procedure. Buyers should agree how defective units are documented, replaced or credited and whether freight is included.
Packaging should protect the lens and keep colors or variants clearly separated. Carton labels, barcodes and model identification help warehouses avoid mixed inventory. For private-label programs, the lamp, inner box and master carton should use the same controlled product code.
Batch inspections can include light function, polarity, appearance, dimensions, wire length and sealing workmanship. Consistent checks reduce the cost of sorting goods after import.
- Use a Complete RFQ Checklist
A professional RFQ for an LED side marker light should include:
Vehicle type and destination countries
Intended lamp function and mounting position
Required color
System voltage and electrical requirements
Overall dimensions and mounting-hole spacing
Wire length, connector and polarity
Required IP and temperature evidence
Required EMC and lamp-approval documents
Order quantity and annual forecast
Packaging, barcode and private-label requirements
Warranty procedure and inspection plan
The best side marker lamp is not simply the brightest or least expensive option. It is the version whose color, fitment, wiring, sealing and documentation match the buyer’s actual vehicle program. A disciplined specification process reduces installation changes, warranty exposure and compliance risk before they reach the production line.